
Dictionary Wreath
3:29 PM I love using words as decoration, whether it be old books, poems and quotes, individual letters, scrabble tiles, ceramic letter balls or any number of other ideas. It brings so much character to a room! In fact, I've always wanted to wall-paper a small bathroom (read: half bath) with old dictionary pages. Ah, someday....
That being said, this is a super-simple, inexpensive idea that will bring a touch of "sophistication" to your doors, walls, or wherever you choose to hang it. Hey - omit the ribbon and add some tall candles in the center and you've got yourself a fun table centerpiece!
This is a great way to re-purpose an old dictionary that's falling apart, or any old book for that matter - just as long as you don't mind tearing it apart. I bought my dictionary at a thrift store for about $.50 - just look for one with nicely yellowed pages.
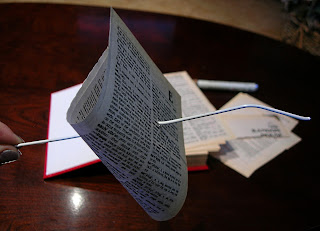
For this project, all you need is an old dictionary, a wire hanger, pliers/wire cutter (so you can take the hanger apart), and a ribbon. My first choice on ribbon color was black, but I happened to have extra red ribbon from another project, so I just used that instead. (It does make it look a bit Christmasy, don't you think?) ** I also used a gold leafing pen to draw little designs on some of the pages. This is absolutely unnecessary - it looks great without it, but I liked the extra sparkle it adds. **
Step 1 - Take apart the hanger. I cut the tip at an angle, making it easier to thread the pages onto it. Then I straightened it out (as best I could), and gave it a slight curve to make it easier to wrap into a wreath later on.


Step 4 - Tie on a ribbon. I made my "knot" the bottom of the wreath. That way, if the pages settle and leave a gap, it won't show a chunk of twisted wire. Using the "knot" as a reference point, I looped a ribbon around the wire and tied a bow at the top.


![Facebook_F[1]](http://farm8.staticflickr.com/7175/6426658719_cd31bb8b47_s.jpg)


2 comments